Thursday, August 29, 2013

Sew Weekly Reunion: Self-Drafted Fall Dress

I'm a pretty tidy person. Not tidy as in I like to clean, but tidy as in if I'm wearing a white pants suit, I will totally order spaghetti, eat it all, and not get a single splash of tomato sauce on me.

So when I wore this dress out to get photograhed today for the first time and got a rather large grease spot on it, I was naturally upset. However, that's just how it seems to go with this dress. It does not want to be made.


I swear, the fabric just wants to hang out with me while I touch it all day rather than become something super comfortable for me to wear. The fabric is amazingly soft jersey and I probably could carry it around all day and be happy.

But I digress. I've been working on this dress off and on for over a year. I blogged about how awful it was behaving last February, but when I saw the colors involved in the Sew Weekly Reunion, I knew I had no choice but to figure that mess out.


 And I did! Kind of.

So originally I drafted a simple dress but somehow everything was misaligned when I put it together. That should have been an easy fix, but I'm using jersey and I used a reinforced stitch which meant that I had to rip each individual stitch to get it out (aka hours of work) AND I had to be super careful because I didn't want to rip the jersey.

I actually sat and very patiently ripped out the stitches because I was afraid I wouldn't have enough fabric and then, right at the end, I ripped a huge hole in my bodice.


So I rummaged through my Suitcase of Scraps, luckily managed to find large enough pieces, and redrafted the bodice. I also cut some gray jersey for more interest.

Franklin is in charge of the Suitcase of Scraps.

Originally I gathered the bodice underneath the bust, but my sewing machine and the fabric talked and decided that no matter how many times I sewed it, they did not like the gathers there. I ripped it out and re-sewed the bodice 3 times before giving up on the gathers.


I also may have talked to my father at that point in time and he hinted that I might be getting a serger for my birthday so I decided I would just wait to re-sew and/or change anything about the dress until after my potential new serger arrives.


Of course, I still needed to gather the top before I could wear it out. The sewing machine failed me again so I gathered the top by hand. I rather like the look actually. (And ahem, I should probably have pressed this dress before the photoshoot. Ah, details.)

I was originally thinking of adding a gray panel to the bottom. I'm not sure if I was just feeling lazy or what but I decided I there was enough gray and it was fine as is.


So yeah, the dress didn't turn out exactly how I thought it would in my head, but I am so happy with how it anyway. I love the colors, and I might add sleeves when it gets cooler out.

I'm also ridiculously pleased with myself for drafting all of this. Last year when I drafted it and it came out terribly I felt so demoralized and I haven't drafted anything since. But I'm feeling much more confident, probably because my sewing skills have improved so much over the last year.


I also bought a 1920s draping and 1930s drafting book for myself and I can't wait to learn more and improve this dress and all future self-drafted patterns!

Sew Weekly Reunion Info:
The Facts
Fabric: jersey
Notions:  n/a
Pantone Challenge colors: Turbulence and Vivacious
Pattern: (post a picture of the pattern): self-drafted
Year: 2013
Time to complete: 2 afternoons
First worn: today!
Wear again? yes, definitely
Total Cost: $10-20

Monday, August 26, 2013

Inspiration: The Hour

I have a confession. I don't actually want to wear any of the dresses on Mad Men.

Don't tell anyone because I'm quite embarrassed about it. But I feel like there's vintage that can be worn whenever because it's classic and then there's vintage that is nice to look at, but very dated and belongs in museums or on tv. I think Mad Men falls into the latter category, which is why I always have so many problems choosing a dress for Julia Bobbin's challenge (which I love and obviously made a dress for and will continue to participate in every year).

I typically want, at a minimum, to update either the fabric or the style, and I've always accepted that that was normal. Because Mad Men is a historical show.

But then. Then I came across a show that has been dubbed "Britain's version of Mad Men."

I watched The Hour, expecting it to be good as most British shows that make it across the pond are. (Hopefully that works both ways and you guys only get our best, but somehow I doubt it.)

However, and I fully expect this to be controversial, I think The Hour is better than Mad Men. It's a little different so it's not necessarily a fair comparison (it's about news journalists at the BBC uncovering stories vs an advertising firm thinking up clever slogans), but not only do I think the writing better, but I think the dresses are better. Like, I would wear them as is.


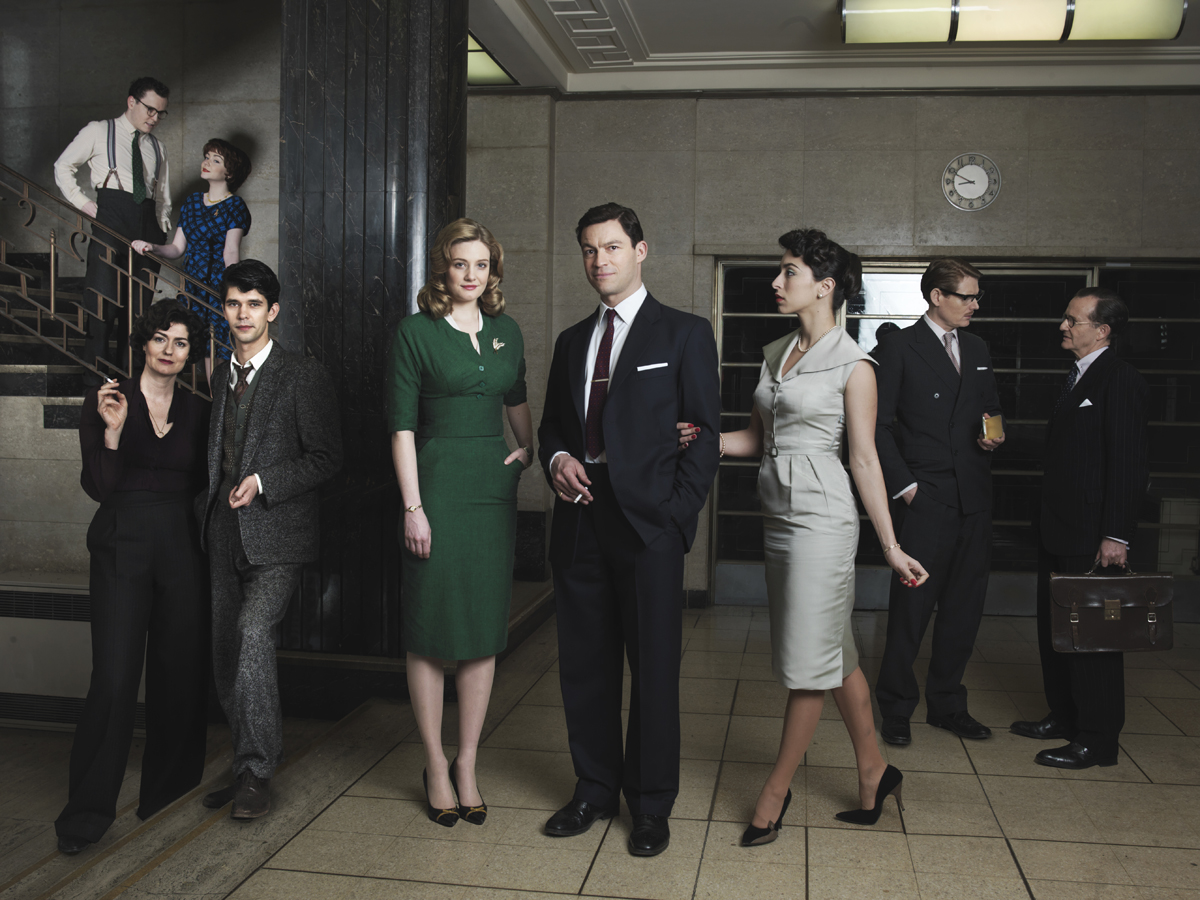
Look at this beautiful cast! You have Sissy in the back on the stairs, a minor character with the most adorable outfits. Lix, bottom left, is a kick ass journalist who wears trousers and button down blouses. (She won't be featured here because of said outfits, but she's great.) Oona Chaplin plays Marnie, the wife of the lead anchor. (Guys. GUYS. I LOVE Betty Draper. Sure, she has issues and isn't perfect, but her character is fantastic, and I understand why she's so bored and depressed and hateful and I will always defend her... but Marnie is my new favorite housewife. Betty is who I'm afraid I'll turn into. Marnie is someone worth turning into.) And lastly, someone who should be front and center is Bel, the television producer who's trying to turn out her news program each week. I suppose you could call her the "Peggy" of the show, but that would really do Bel a disservice.

Okay so I'll try to refrain from telling you how amazing everyone is (because you're already downloading the first 2 seasons, right??) and focus on the outfits. Which I adore.

(And look, I made collages which are hopefully easier than scrolling through a hundred pictures!)


So Sissy is the young assistant. She wears the most adorable outfits. Usually it's colorful dresses with full skirts, but she also wears embroidered sweaters that I frequently drool over. And the neck ties! Love them.


And Marnie! As the housewife, she wears your standard full skirts, but they're always so interesting. The pink outfit, top left, is very, well, pink, but I feel like when it's paired with the black stripe it's rather unusual, as is the way it's sewn together. The blouse, while seemingly plain, has these great pleats near the neckline which gives it so much more interest.

The fabric in the center top has tassels on it! Which is so fun, and something I would normally pass by in the store. The center outfit is just so perfect: an a-line skirt with an embroidered sweater and a neck tie. (Clearly I need to get on and make some embroidered sweaters and neck ties!)

And the bottom left is a simple lace dress. My fabric store just got in some fabric that resembles lace but isn't, and I think I might try to replicate it. Of course, I'd love to replicate them all. I pulled all of these photos because the necklines and fabric choices are so creative.


And Bel is the producer. As such she wears very simply, business type clothing. Mostly pencil skirts and jackets. (I just adore that red plaid skirt.) Sometimes pencil dresses. She also has fantastic necklines with lots of pleating. The top right is an evening gown that is so simple and stylish. Romola Garai, the actress, actually complained that her character was dressed too nicely for the time period and her station. That may or may not be true, but I do love how her outfits are all business, yet still feminine.


And let's talk about this coat for a moment. I think this would be perfect to make for fall. It looks so cozy and stylish. And I'm such a fan of hounds-tooth.


But actually, I'll be making this dress first. As part of the Copycat Challenge, I'm making this pencil dress, and I'm self-drafting it. I spent most of yesterday trying to figure out the top. I had a general idea of how to make it, but then I couldn't get the neckline to lay flat.


Anyway, I've pretty much figured it out (I think) and I've started sewing it up. If all goes according to plan, I'll have it done this week and then I'll be able to make TWO outfits from The Hour, on my way to sewing them all!

Has anyone seen The Hour? Can we please talk about how amazing it is? (And if you happen to think I've just finished it and that's why I'm obsessed, you'd be wrong. I've seen the whole series three times over the past year.)

Friday, August 23, 2013

Jazz Age Lawn Party

Last weekend was the Jazz Age Lawn Party in New York City. It happens twice each summer, and last year I made a 20s inspired dress... that I didn't finish in time. This year I knew my Great Gatsby dress would work perfectly for the occasion, and even better: it was already made!

Naomi and I got to Governor's Island early and walked around. (She also took all the lovely photographs of me.) The island used to be army barracks but now no one lives there. There's tons of green, trees, everything is within walking distance, there's close access to a large city - in short, it's pretty perfect for me and I'm trying to talk to someone about letting my family move in. Let me know if you have any connections.

Me standing in front of my potential new home. It's a perfect fit!
Naomi and I got back in line to get in to the fenced off area, look at some cute vintage booths, grab some food, and listen to the bands play.


(Yes, she made her dress and hat as well! Read about it here.)

Oh, and did I mention the chickens? There were chickens, I believe they were promoting composting, and I HAD to get my picture with them since the print on my dress is made up of chickens. Originally they were going to let me hold a chicken, but then they decided everyone might want to hold the chickens, so I knelt next to them. 


I'm honestly quite relieved because they were MUCH bigger than I thought they would be, and also I was terrified they would scratch me. However, they seemed very soft and friendly.

These old cars still work! It was a lot of fun to see them drive off the ferry when we arrived.


Ashley came as well! She reminded me that I made a hat to go with the dress. I completely forgot it in the excitement of getting ready and making it to the ferry on time. (I ran most of the way and just made it, thankfully!)


 And what would a 1920s throwback be without knitting?


On the off chance you're interested in seeing people other than me, here are some of my favorite costumes and people. Unfortunately, I really could not capture the mood. It was such a lovely time. Almost everyone dressed in costume, and there was a lot of dancing, eating, drinking, and just a general good time. While the event has become so incredibly crowded and they're starting to sell out on certain days, everyone is still mostly good natured and it's so nice to see everyone dressed up in nice clothing. (All of the costumed kids were my favorite part.)


If you're interested, you can check out my album here.

Have any of you ever gone to vintage events? More importantly, are there any others in the NYC area??

Monday, August 19, 2013

Show Off Your Skivvies: The End (Finally!)

I am so pleased to announce that we are officially done with the Show Off Your Skivvies challenge. Yes, I know it was supposed to be over July 31st, and Ashley already did her wrap-up post, but what can I say? I like to take my time.

I really want to thank everyone that participated. It can be terribly scary showing off underwear (and even swimsuits!) on the internet, but I really think it's for a good cause. Not only are you potentially trying something new, making something better fitting, and making something that potentially saves you money, you're also showing it off for other sewers so they know if they want to make it, and to learn from mistakes you may have made - after all, isn't that why most of us have sewing blogs in the first place?

Another thing I was especially touched by was the number of people who wrote about their own body issues and explained why they were participating. Everyone has a story, everyone feels pressure to look a certain way, and while posing in my skivvies may not have cured everything, I feel much more confident about my body than I did when this started, and I hope everyone who participated feels the same way. Ashley and I hope to do this again next year so if you missed it or weren't totally ready to bare all, you have some time to get on board!

I also want to thank everyone who guest posted for this challenge. We learned so much, from how to find/make bras that properly fit to learning about the design process to learning how to make undies from our fabric scraps. Please check out the page with everyone's links and click around. There's so much information, and I just hope to add to it next year!

At the risk of sounding like a terrible Oscar winner who just goes on forever, I will wrap this up as the awful music just gets louder and louder. Below is everyone posing in their skivvies with links to their blogs. If I missed you, let me know and I'll add you to the group.

Thank you, everyone!


Teal Blue Bikini // Signora Aurora

Bombshell swimsuit
Bombshell Swimsuit // Very Purple Person

Kitty Hugs
Two Piece Swimsuit // Gjeometry
Green Bombshell // Kathy Sews

Two Piece Swimsuit // Young, Broke, and Fabulous

Finding/Making the Right Bra Size // Very Purple Person

Bombshell Swimsuit // Kathy Sews

And of course your hosts Ashley and I made many things as well!

Colette Nutmeg

Jasmine bra

Rosy Ladyshorts

French Knickers and Pajama Top

Amerson Undies

Ginger Swimsuit

Classic Bra

Thank you again for making and showing off your undies! I look forward to seeing some more next year!

Friday, August 16, 2013

Sewing Skivvies: Tips and Tricks to Sew a Swimsuit

So, let's talk swimsuits. It's a little late in the season to make one, unless you're in another hemisphere or very motivated but because I've been getting this question a lot, I want to share what I've learned from making mine.

I am by no means an expert, so I'm not sure I'll be able to help you with any real issues, nor will this list be all inclusive, but here are a few little things I discovered.

First, swimsuit fabric is slippery. And it rolls. It can be very frustrating to work with. If you've worked with jersey before, you probably know what I'm talking about.

Elizabeth recommended sandwiching the fabric between tissue paper and ripping it away after you're finished - I think that's a brilliant idea and I wish I had thought of that.

Another issue I had that complicated things was lining up 4 layers (the 2 outsides and the 2 linings) and stitching together. Because it's so slippery, everything moved constantly. Basting the lining with the main parts would have been a great step to take.

I don't have a serger, and I really didn't think it would be a big deal to use a regular sewing machine - after all, isn't that what the zig-zag stitch is for? Alas, no. If you want a truly professional finish and don't have a serger, take the time to go over to someone's house and use their serger. Look at the photo below. I redid the middle seam with a zig-zag at home, and while the seam is sturdy, it's not nearly as flawless as the rest of the stitching.

Can you spot the non-serged seam?

I kind of thought people with surgers were being snobby when they said not to use a regular machine, but they were just being truthful.

(I would just like to note that yes, I did zig zag the elastic on and I would recommend that - my complaints here aren't with the zig zag stitch itself, but how you can see the thread when you use that type of stitch to seam together the pieces. I would also like to note that from a distance, you can't really tell so if you're not a huge perfectionist, you'll be fine.)

Okay, if you're not as lucky as me and you can't get your hands on a serger, all hope is not lost. Machines typically have an overlock or overedge stitch, but I really didn't like it with this fabric. I probably just needed to play with the tension, and that's not something I'm prepared to do.

However, the straight stretch stitch (see photo below) gives a really great stitch and I would use that instead UNLESS you're matching a pattern or  you tend to have to unpick a lot.

Photo found here
You see, the straight stretch stitch locks 3 times - forwards, backwards, and forwards again. That means if you need to rip out some seams, you better settle in for DAYS. (May I recommend basting or zig zagging first, then using this stitch over it?)

Here I quickly straight stretch stitched over the zig zag and I think it's much better, not as many "teeth."
To be honest, those are all of the things I would warn someone about when making swimsuits. If you've worked with knits and if you've worked with elastic AND you have access to a serger or the straight stretch stitch, you are ready. Go and make beautiful swimsuits.

(Though of course be sure that everything you're getting is waterproof and swimming pool-proof. I would recommend a nylon/spandex mix for the suit. Lining just needs to be a knit lining, and you can totally use the same fabric you used for the outside. The elastic needs to be rubber elastic or swimwear elastic.)

If you're not used to working with knits or elastic, just do a few practice rounds before starting.

For other resources, check out the many amazing links from the SwimAlong Project. They have pattern ideas and inspirations, places to shop online, and construction detail tutorials, like adding cups.

Still have questions or looking for something specific? Let me know and I'll try to help as much as I can, even if it means directing you to someone else. But give it a whirl - swimsuits do not have to be scary!

And if you have a tip that should be included or link to something great, let me know!

Tuesday, August 13, 2013

Sewing Skivvies: Ohhh Lulu's Ginger Swimsuit

Guess who's finally finished with the swimsuit!!


I am so in love with this suit. It's not perfect. Not even close, but I am ridiculously pleased with it and now I need to go to a beach immediately!

So if you remember from a month or more ago, I used Ohhh Lulu's Ginger Bodysuit, which you can buy here! I did have some issues assembling because I cut out the parts and discarded the paper BEFORE placing it all together. That might have been helpful. Luckily, I had an excellent sewing partner.

Unlucky for my sewing partner, though she somehow never complained, because she would arrange the pieces and I would feel a shudder of terror go through body as I would shriek, "No, no, do it again! This isn't right! See the stripes?! The stripes must match!!!" 

It was  a terribly dramatic time for me. Sorry, Ashley.


But anyway, stripes! My first time with stripes and they mostly match. There's a few pieces around the top that don't line up exactly, but I made it work and I'm so proud of myself.

I'm a little disappointed with the adjustments I wanted to make and didn't follow through with due to poor planning on my part. I wanted gathers under the bust but even though I cut the largest size for the chest (so I'd have plenty of extra to play with), it wasn't nearly enough and in fact, I ended up needing all of the fabric I cut for the top.

I also wanted to lower the sides on the bottom and add ruffles, but then I got tired and decided to scrap the idea. I still have some fabric for another pair of bottoms, but we shall see if I have the time or energy.

That being said, I am very pleased with how the pattern turned out sans the modifications I was thinking of making.

I was terrified that the bottoms were too revealing, despite having a higher waistline.

I was also annoyed that the back rides up (due to my larger rear) and I discussed jokingly about doing a full bum adjustment.

Not a bad idea to be honest, but once I tried on my old swimsuits for comparison, I realized they all rode up in the back and I had just never noticed. Furthermore, they were actually much more revealing on the bum.

Weird how you only notice those things once you're sewing!


Another thing I'd love to work on with my full bum adjustment is the saggy part in the back. It's actually not as noticeable with this swimsuit (especially compared with my RTW swimwear), but it's something I always have to deal with and if I'm making bottoms myself there must be a way to do away with it.

(Or is that one of those things that's totally normal and once again I missed the boat because I was over in the corner being self-conscious?)


Can we pause for a moment and talk my hair? I wanted to do an old time-y photo shoot  because the stripes just scream retro to me (and completely forgot to bring the rest of my props on the roof!) but this hair-do with the victory rolls is so easy and I felt so gorgeous and also like a siren. I told my boyfriend I wanted to go out and call men to their deaths and he just laughed.

I was so serious.


Okay so back to the swimsuit. 

I'm going to compile a tip sheet for swimsuits with links to people who know much more about swimsuit sewing than I do. (Edit: Tips here!) But I was so surprised at how difficult it was. I like knits. I think sewing with knits are fun.

But this was not fun.


Maybe it's been too many months since I actually worked with knits but this fabric rolls like crazy. And the trying to get the stripes lined up was insane.

Perhaps if I had basted the lining to the main part instead of trying to serge all 4 layers together at once while lining up the stripes.

But why would I do anything to make my life easier? ;-) It worked out in the end.


Everyone wants to know about how concerned I am with the white stripes on the swimsuit. I'm not at all. It's fully lined and I carefully laid out the pattern pieces so that not only would the stripes match but the green parts covered all my bits. So I am 100% okay with jumping into a body of water.

A lot of people having been making a lot of awesome swimsuits this summer, and every single one of them says that they love how they feel and they want to wear it out. While I'm glad everyone's feeling some self-esteem, I may have scoffed a bit because it seems a bit ridiculous to feel amazing in swimsuit but actually, it's true.

I feel incredible in this suit. I don't feel self-conscious at all. I think making your own suit is perfect because you have so much control over it, from the pattern to the fabric to even how tight you like your elastic. And it's a million times cheaper than paying $150+ for a nice one.

So yes. Everyone go make swimsuits!


And, ahem, that officially concludes the Show Off Your Skivvies challenge on my end... only 13 days late. Not too shabby. I'll compile a list of links for those looking for resources for the own swimsuits, and I'll have a final round-up post.

Next up: probably a dress.

Monday, August 5, 2013

Sewing Skivvies: We've come to the end (almost)!

And so we come to the end of the Show Off Your Skivvies Challenge! Ashley has a great round up of everyone's posts who participated.

However, there will be a few more posts from me because I'm not done with my swimsuit yet. Technically the end of the challenge was supposed to be August 1st, but do I ever finish anything on time?

That said, I am almost finished - just a few more bits of elastic to put on. And then, of course, I need to wait for my sunburn to go away because despite nearly 3 decades of practice, I still can't apply sunscreen evenly. And then, as it just so happens, my usual photographer loving boyfriend is out of town so I'll need to arrange for someone to take pictures of me... BUT this week, I will have pictures up by the end of this week.

And if you're a slacker like me, and still working on something, just let me know and I'll include you in my final post. If you sewed something up and wore it on your blog, and we missed it, please let me know and I'll also make sure you're featured as well.

Otherwise, go check out Ashley's post!