Monday, April 29, 2013

Me Made May and other news


After a lot of denying the inevitable, I have decided to join Me Made May.

I originally didn't want to for a few reasons.

1. I already wear the clothes I make.
2. As a beginner, I haven't made a lot of clothes.
3. I already know the gaps in my handmade wardrobe. (Hint: it's all of it.)
4. I'm probably not going to finish my pile of "just needs to be stitched a little." I'm too lazy to change out all the different color threads.

But then I decided that, yes, I was being way too lazy. I re-read the description and it's all about challenging yourself and I was just excusing myself and my negligence.

I tend to wear the same outfits over and over and yes, many of them already have something handmade in them. But it's the same. So to challenge myself, I'm going to attempt to style them differently so even if it's the same skirt or dress, it won't be an exact copycat outfit. Because that's normally what I'm all about.

And yes, perhaps I will tailor some outfits from my pile.

 'I, Kristin from Sew Classic, sign up as a participant of Me-Made-May '13. I endeavour to wear 2 hand made items each week for the duration of May 2013. I will also tailor 2 items of clothing during May 2013.'

Whew, this might be harder than it sounds.

Because I'm doing Me Made May, I set up a flickr account. I'm not entirely sure how it works, but maybe we can be friends there?

And because of that, I went ahead and set up a facebook so if you feel so inclined, you can like me on there! I've had a tumblr for awhile if that floats your boat.

A few people have found my twitter, which is cool and not hard to do, but it's not totally sewing-centric. I don't really want to create a new handle since twitter won't let you do that easily (or switch between handles easily) so I'm not sure if I'll change mine to something more generic but slightly sewing based or what. Hm. Facebook might be a big enough leap for now!

Okay, I changed my twitter handle. New one here!

Monday, April 22, 2013

Finished: Mad Men Challenge 2

(Check out my contest I have going on here!)

The Mad Men Challenge is finally done! This challenge had a lot of firsts for me: First time I've ever used a pattern on the fabric. First time I've ever made a pencil skirt (or dress). First time making a back vent. First time my sewing machine broke* right as I was about to finish...

It's also the first time I'm ridiculously pleased with my dress! I love my other projects of course, but there's always been something a little off, even if it's just that I didn't finish the seams and the inside is slowly unraveling.

When I initially started thinking of what to make for the Mad Men challenge, I gravitated towards Megan and Joan dresses, but when I went through my stash, I saw only one type of fabric that I thought would work for this challenge, and instantly I knew what dress I wanted to make.


I searched and high and low for a pattern that would work for the dress. I'm not even joking, I spent WEEKS looking for this pattern. Whenever I found something remotely similar, it was several sizes too small and about $20. Sure, I could adjust the size, but not when I'm spending $20. (Sorry, I'm cheap.)

Vintage 1962 McCalls Sewing Pattern..6449..Misses Size 12 Dress or Jumper with Slim or Full Skirt and Blouse
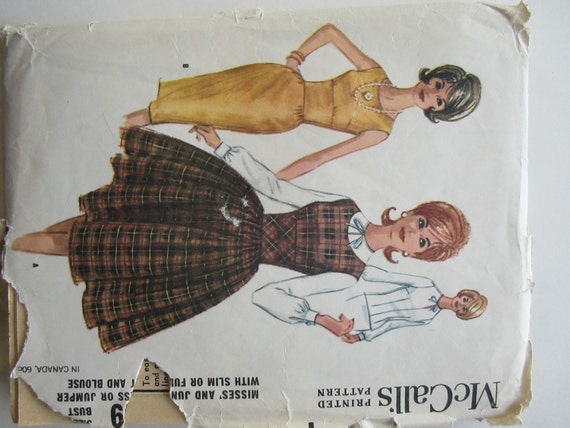
So finally one day, I decided I was making a decision. I went through ebay. Nothing. I went through etsy. Overpriced, wrong seized patterns. Finally I was on page 50 and I said, "I should stop. There's no way I'm going to find the exact dress I want at the price I want." And then, I swear, the next pattern my eyes landed on was the exact dress I've been searching for, in my size, and for $15 less than everyone else.

McCall's 6449 was a gift from the universe, I swear.


Have you met Franklin yet? He REALLY wanted to help this dress along. Whenever I had my fabric pieces out, he would pull them on the floor to make a soft bed for himself.


He also discovered my ring cushion pin and kept stealing it from me. Then he discovered my bag full of sewing parts and would rummage around in it. He also decided it was fun to hit the tops of my sewing pins, try to knock the iron over, and jump up and try to grab the needle while I was sewing on my machine. I don't know why he took such an interest in this particular outfit, but it was very frustrating.

His punishment.
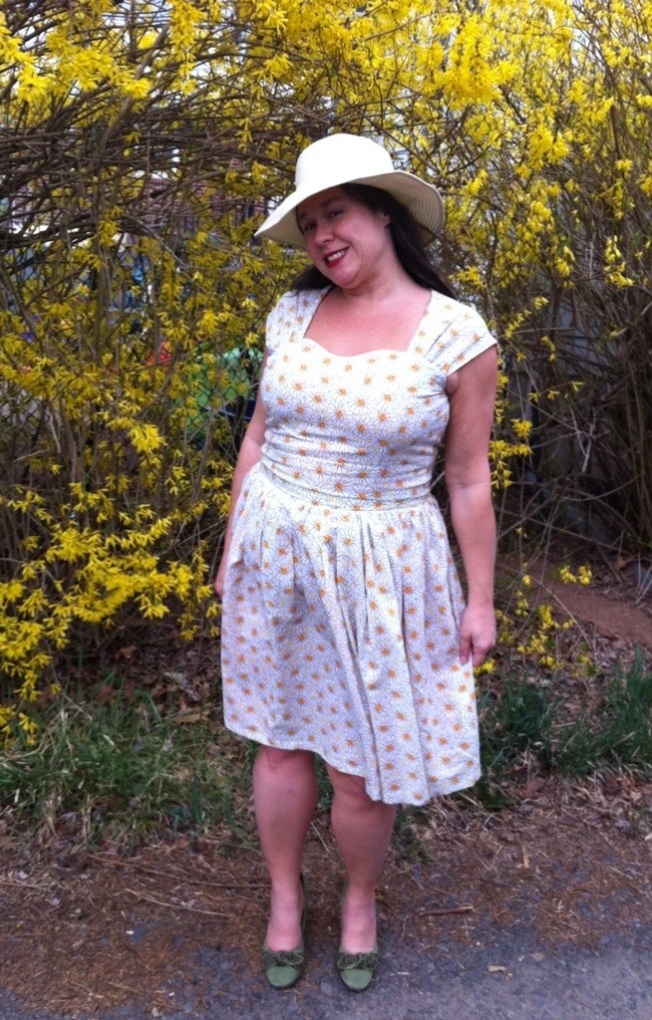
 I know you want to hear more about my cat, but on to the dress! I was so nervous for this dress. I knew it was either going to fit me like a glove or not at all and luckily it was just like a glove!


I was also a little nervous because as a pear shape, I've been told a million and one times that I should only wear dresses that fit through the chest and waist and then flare out or else I will look disgusting. Even my mother has drilled into me that I need to make sure to "balance" my body when I get dressed.

To be fair, the few times I have tried on pencil skirts in stores, they did look atrocious, but that's only because they were cut straight down and so not really a pencil skirt at all despite the words on the tag.

I was actually planning on cutting the skirt to be A-line, but then I was inspired by Romola Garai in BBC's The Hour. She's a bit bigger than the average stick in Hollywood and wears form fitting clothes and looks amazing. So I decided to go for it.


If you were here when I did the Pushing Daisies dress, you'll recall all the trouble I had with the neckline. Same. Exact. Problems. I really need to account for my narrow shoulders next time. But this time, instead of doing it over and over again, I just added 4 darts. Two in the front and two in the back. You can hardly tell because of the pattern, and even if you could, I still like it, but best of all: it's not off the shoulder anymore!

I really hate strapless bras.


The front is mostly gathers above and below the waist, and of course the 2 darts I added in. The back is all darts, and I sort of wish the front were as well, but the gathers do look quite nice.

Let's talk about this pattern on the fabric for a moment.


This was the first time I've ever used a patterned fabric. Patterns scare me, and it's why this fabric has sat in my closet for almost a year. I really didn't check to see if I had enough to use the pattern correctly. I just held it up to my body and was all, oh yeah, there's enough here for a form fitting dress.


Then I began cutting around the flowers because I didn't want anything obvious over my chest, lady parts, or my bottom. The boyfriend was VERY worried that the dress was going to be too suggestive and helped me with this part, but I think it turned out fine.


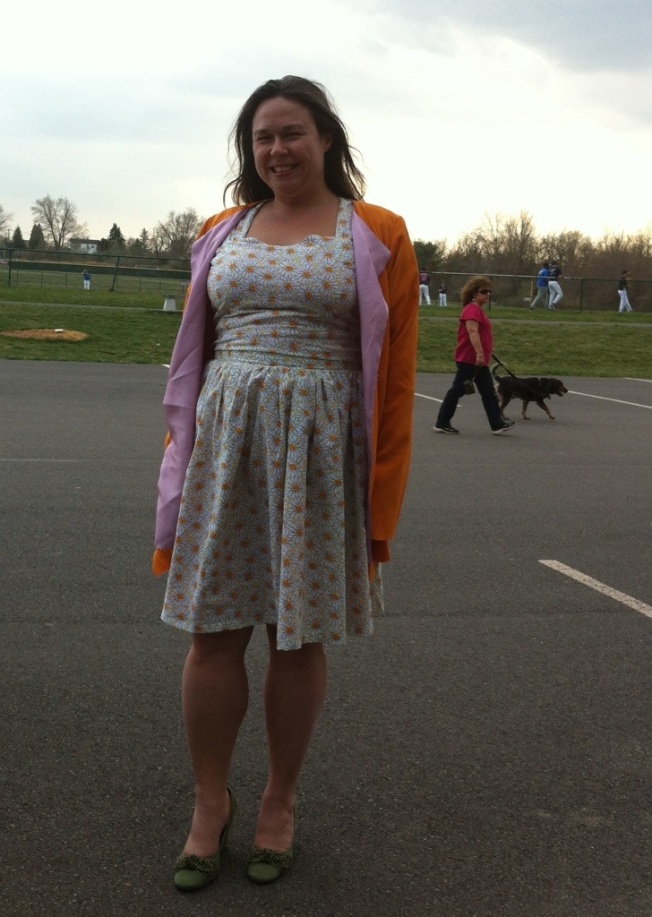
I do wish I had shortened the front skirt about an inch so that the flowers from the waist don't look like they're spilling down into the skirt, but I keep telling myself it's not a big deal and no one notices but me...

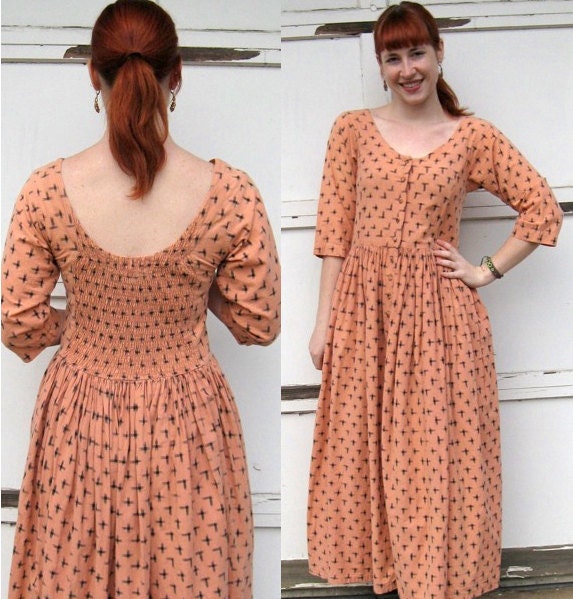
Check out the back! I had just enough to do the back panel and I added 2 inches just because I was worried it was going to be too tight. THANK GOODNESS I added those 2 inches because I ended up taking out 2 inches for the back vent and it never would have fit otherwise.


Also, if you notice the lack of flowers over the rear, that was all thanks to the boyfriend. He very carefully laid the back piece out (and luckily it worked because this was all that was left!), but I honestly don't think it would have made much of a difference because of the 2 inch vent and the 4 darts that total to about an additional 2-3 inches taken out so the pattern might not have been suggestive anyway.


I'm including this picture just for the hair. I love the giant updo but the boyfriend called me a woodpecker. He clearly knows nothing about style.


So yay! This dress isn't perfect as the side seams aren't totally down the side and I accidentally burned off a bit of the lining with my iron, but I'm so ridiculously proud of this. I can't wait to sew more once my machine is fixed!

*So my top thread is getting caught on the bobbin case as it moves around and after the 3rd stitch the machine seizes up. The internet says it just needs some oil so hopefully that's all it takes! Let me know if you have other ideas.

Wednesday, April 17, 2013

Musings

So now that I've wrapped my first ever sew along, I have a few thoughts. Firstly, oh my gosh, wow, I can't believe how tedious sew alongs are!

Secondly, yay for other Pushing Daisies dresses! Shelley over at Cuckoo Chanel did an adorable Chuck dress. Here was her inspiration:

20130416-070929.jpg

And here is her daisy sundress that I really want to make now! It's so perfect for spring and summer!

20130416-074108.jpg

20130416-074534.jpg

20130416-071951.jpg

Let me know if you made one as well because I would love to see!

But, yes, this sewalong: tedious. I really had no idea. I love when other people do sew alongs because I enjoy watching other people's processes. Sometimes it's the same as mine, sometimes mine is better, and sometimes I learn A LOT from whoever posted. I don't feel like I'm an advanced enough sewer to really teach new and high quality techniques, but maybe they help someone who's less advanced than I am. And maybe someone out there can teach me something after I've posted something monstrous.

"You want me to do what now?"
Obviously sew alongs are tedious and slow because you have to stop and document every single step of the process and then blog about it. But it's more than just that, at least for me.

I have a slight confession: I don't always enjoy sewing. I get a backache when hunched over my machine after a few hours. At night, there's never enough light to see and my eyes strain. When I'm sewing something and the fabric catches causing a pucker, I get very angry. When the tension goes crazy, I see red (especially when I was newer and didn't realize machines needed to be cleaned - oops!).

RAWR
So because I don't always enjoy the process, I take short cuts. I hide mistakes rather than fixing them. I don't like to finish my seams - I say let them unravel!

This sew along has made me slow down. A lot. When I made a mistake, I would take the time to rip the seams out and start again. But as I was going through and redoing parts of my dress (and hating it), I stumbled across a blog that was discussing how clothes used to be made.

Clothes used to be higher quality, especially because they were made in the home, as opposed to being made by child slaves and then sold across the country for $5 a pop. The blog* mentioned how many vintage handmade clothing items were lined, and she mentioned how nice it would be if everything were lined in silk just because it would feel amazing against your skin. Every time you moved, it would be luxurious.

So luxurious you just want to fall asleep.
Now, as a sweater (e.g. someone who sweats excessively) and someone who lives in a ridiculously hot climate with no air conditioning in the summer, I'm not so sure I like the idea of everything being lined in silk. But it still made me think. If I want to have an entire wardrobe of mostly hand sewn things, of course I should focus on quality and not just the end result.

So my resolve for nicer things, along with the fact that I'm broadcasting my every stitch and I don't like the idea of pointing out mistakes (and how to hide them) made what should have been a simple project take weeks longer than planned.

"Weeks longer?! I'm exhausted already."
That said, I'm ready to dive into so many more projects, but I'm excited for one in particular and I may blog excessively about it at times. I'll have more info up soon, but it's going to be from another television show, and it's going to be from the 1960s. Like this one that tackled lace, I'm going to tackle another something that intrigues me, but also frightens me a bit: jackets. (And maybe it'll be ready in time for the fall!)

But first I need to finish my Mad Men dress! Thanks goodness the deadline is extended!

*Sorry, I can't find who wrote it or where! If this sounds like your posting or you know whose it is, please let me know so I can give credit.

Monday, April 15, 2013

Finished: Pushing Daisies Dress

I know you were terribly afraid I was going to update with yet another post on why you shouldn't use vintage patterns that resemble aliens, but worry not! 


With the neckline still looking vaguely Mormonish, I'm pleased to say that I'm finally finished with the Pushing Daisies dress! After fighting with it for what seemed like every step of the way, I'm generally really happy with how it turned out.


I do think I might take out the sleeves at some point just because it would make the dress a bit more versatile to wear in different seasons, but I'm not touching it any time soon. (Plus, it's much too cold to really venture out without tights, let alone sleeves!)


And of course it would be the Pushing Daisies dress if I didn't make some PIE!

For those unaware, the main male character, Ned, is a piemaker. He makes delicious and amazing looking pies in every episode. Chuck, the main female character, sneaks around and makes special pies for her aunts with gruyere baked into the crust.

I don't think I can say this with enough emphasis but WOW. The gruyere in the pie crust is the best decision anyone has ever made. Ever. I mean, yeah the apples and cinnamon and sugar is good and all, but I'd eat the freaking butter, flour, and gruyere all day long. 


And now for your entertainment, I present a story in 3 parts.

Yay, I made a pie.

I am going to eat this pie right now.

Hehehe I have pie.

Fin.

(For those unawares, the bf and I don't have a weird no touching policy, it's from the show.)

Edit: Boyfriend finally tasted the pie and our conversation went something like this.
Me: What did you think?
Bf: It was awesome, of course.
Me: But what did you think of the gruyere? You could tell when you bit into it, right?
Bf: You mean the lapdance happening in my mouth? Yeah, I could tell.

Thursday, April 11, 2013

Hopefully my last PD update!

I don't want to jinx myself, but I just might have this dress finished by the weekend.
I know I said that already, but then... there were problems. I mentioned briefly that the shoulders were too long, the bodice needed to come in, the arms were too tight, and I don't think I mentioned this, but something had to be done with the waist as well.

I spent a whole evening unpicking all my beautiful facing and french seams because so much of it needed to be tweaked. I spent the next few evenings with my boyfriend who has been feeling terribly neglected.

Last night he unexpectedly had to work late so I grabbed my scissors and started hacking away.

Wait, I think I'm getting ahead of myself.

So Monday or Tuesday, when I thought I was almost done, I slipped the dress on and realized it needed a lot more work. A casual glance down at myself made me feel like I had time traveled from Kansas in the 1980s. I was only missing my 10 children in matching adorable, but dirt stained clothing.

I put my petticoat on underneath, hoping that would make it somewhat more presentable, but all it did was make me look like I had gained 50 pounds.

I tried to document the mess I had made. Really, I did. I posed and everything, but when I checked the memory card somehow they turned out decent. "No, no, this won't work," I said, handing the camera back to my boyfriend. I tried again, but in much worse poses. AND MY BOYFRIEND REFUSED TO TAKE THE PICTURES!

I had to stop and explain that I knew they looked bad. That was the point. He frowned and said, "I'm not going to take bad pictures of you so you can feel bad about yourself. And anyway, what kind of photographer would I be taking bad pictures?"

I suppose it's sweet, but clearly he just doesn't understand. Anyway, I was going to load the decent pictures anyway and try to explain how awful they were because somehow they turned out decent, but the bf took the camera to work and I don't have the patience to wait to update until tonight.

So you get internet pictures instead.

I kind of thought I looked like an extra from Big Love, but it turns out the fundamentalist Mormons are much more fashionable that I am.


Look at those pin tucks! Those collars! The adorable buttons!

I don't have the skills for that.

These are much more similar:

Via

Via
Don't get me wrong. If you're going for the prairie look, these are awesome. But when you're going for something a little sleeker, a little more modern, it can be a problem. 


Remember the original? Yeah, not even close. 

Luckily it wasn't a hard fix. I grabbed my scissors and chopped and snipped and then started adding (or increasing) darts. I hacked the neckline a bit and snipped off some more bodice. Now it's looking amazing! 

I just need to add the sleeves (again) and hem it and I'll be done! Unless something else goes tragically wrong...

Ha yesterday I was looking at close up views of my red lace dress and my heart dropped for a bit when I realized her skirt was pleated and not gathered. I started panicking. Should I undo my gathers? Should I pleat??

Then I mentally slapped myself and decided I was going to only make necessary revisions to the dress so I could be finished this week because god help me if something else goes wrong.

But still thinking positively! So yes, here's my ridiculous shot of me looking oh so cool.


In the home stretch! Again!

Friday, April 5, 2013

Pushing Daisies Sew Along Update: One Step Forward and Two Steps Back

I would like to start off this post with a shout out to MrsC from Sent from my iRon. I won this ring pin cushion in her Sew Grateful giveaway contest, and I thought it was clever at the time, but now that I've been using it, it's not just clever, it's essential. It's so perfect, so easy to use, and I'd rank it second in importance after my scissors. Seriously, get one. (And I rarely use pins at all so you can trust that it must be amazing!)


On to the sewing. I pinned on the sleeves, adding some gathering to make everything fit and they seemed to fit perfect. It was nice and comfortable and looked great.


Except, wait. I don't think the shoulders are supposed to be that low on my arm. Oh, dear.

It turns out, unfortunately, that the dress form I use has wider shoulders than I do.


And when I correct the shoulders, this is what happens to the neckline. Sighhhhh.


I was considering an easy fix and just pinning it off to one side. (Right? It looks rather interesting, I think.)

But when I woke up this morning (because suddenly all my best ideas come when I wake up- so weird) I realized that the armholes are a bit too tight. So rather than being slightly uncomfortable, it's best to undo the entire neckline and add 2 extra darts, fix the shoulders so it's looser and in the right place, and redo the sleeves.

Good news: My first time ever doing sleeves has gone beautifully (minus the shoulder mishap which I don't think was entirely my fault) so fingers crossed that I won't suddenly encounter problems.

Bad news: This is officially the fifth time I've reworked the neckline. 

Good news: At least I won't have that awful boat neck (and so I won't have to wear a strapless bra!) and the arm hole will be more comfortable.

Lesson learned: I am NEVER using a pattern where the drawings look like aliens. It's just not meant to be.


I also began attaching the bodice and the skirt together. I needed to feel somewhat productive after realizing everything needed to come apart AGAIN.

At the moment it looks rather matronly, but I haven't hemmed it yet. 

I'm still hoping it'll be done this weekend, but more likely it'll be finished some time next week. You have no idea how excited I am to move on to something else!

Tuesday, April 2, 2013

Facing Like A Boss

Sometimes I'm pretty lazy when it comes to sewing. There's always a point where I get tired and I'm think to myself, "What steps can I skips so I can be done already?" Usually, the easiest neglect is to skip the facing, roll the hem, and top stitch right along so I can just finish. Sometimes that turns out fine, but often times it doesn't and then I have a sub-par product.

I wanted to do that for this dress. I may have even started, but I knew I wouldn't be happy with it so I ripped it out and went back to figure out the facing.

Originally I cut out the facing for this dress (albeit, somehow, incorrectly) and stitched it on there in the first step, but it just wouldn't work because of the fraying. So I unpicked my sad pieces of fraying facing and traced out new ones. Ones that, hopefully would actually fit the bodice pieces.

Once you have your facing, stitch it on there. I'm all about the french seams on this dress, so first wrong sides together, then right sides together. And you end up with something that looks kind of nice, if only the facing would stay down.


But no matter how many times you iron it into place, the facing is not going to stay down.

Pull it up and you should have the facing on top, the seam, and the bodice piece below that.


Push the seam to the top so that it's on top of the facing. Sew the facing to the seam. This should not affect your actual fabric piece in any way.


Once you've stitched around, iron it down.


Flip it over, and you should have a beautiful neckline with no sneaky facing trying to escape!


This looks a million times better than folding the hem and top stitching (and letting it fray all over the place). Why do I resist this step every time?!